A CNC Plotter is a computer numerical control machine that is used to automate drawing.
Aim
To create a machine that can draw images and draw accurate images or text.
This project required an extension as it ran into a lot of difficulties and was a challenge for myself. I will tell you my progress through building it and what problems I faced doing so.
Building
The project required:
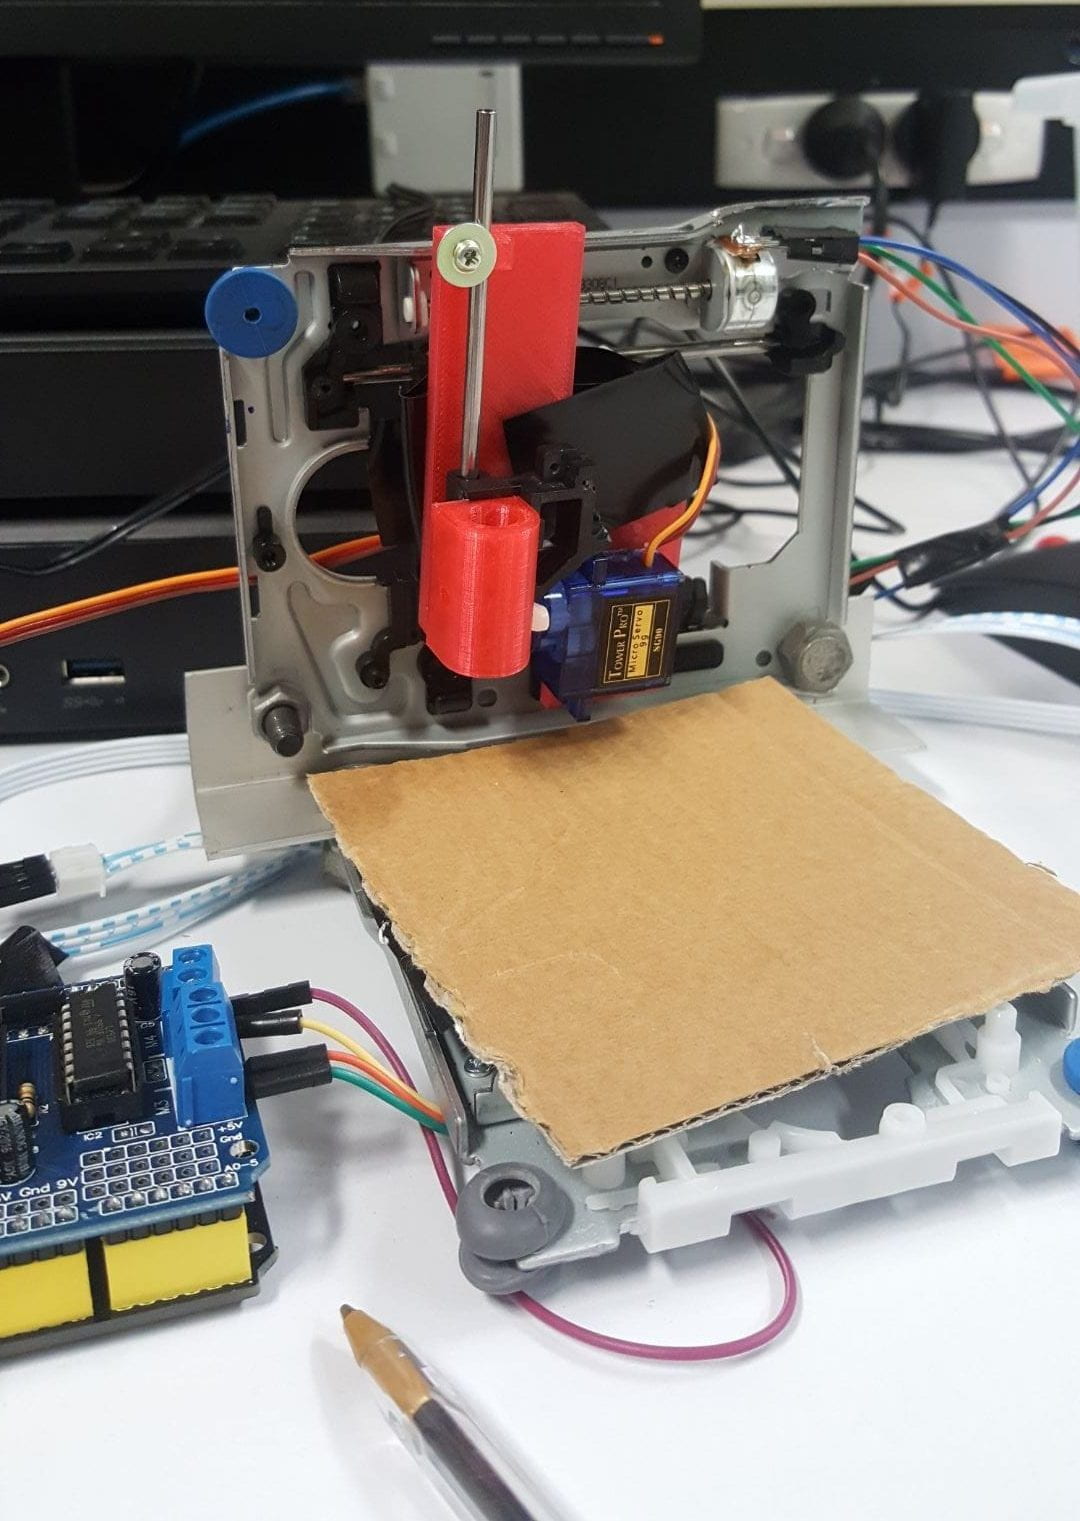
- 3x Linear metal sliders
- 2x Stepper motors
- 1x Servo motor
- 2x CD frames
- 1x 90 degree metal trim
- 1x Arduino Uno 3
- 1x L293D motor shield
- 1x Pen holder (3d-printed)
Metal sliders, stepper motors, servo motor and CD frame were salvaged from three CD drives from Hobart College’s e-waste.
I started by opening three CD drives and salvaging the parts I needed. I then used the CD frames and used two nuts and bolts to attach it to a square angled metal piece which would be it’s frame.
Moving onto building the hardware, I attached the motor shield to the Uno 3, attached wires from the servo motor, and 8 wires which would later be soldered on the stepper motors to the correct ports. Using trial-and-error and researching the pinout diagram.
Soldering work was done to the two stepper motors, which took a long time. The CNC plotter was working! The last to do was add a working pen mechanism. I asked my teacher for advice and he suggested using a felt-tip pen and he lead me in the right way to the 3d file to print.
Finding the pen mechanism 3D file, I had Rob print it overnight and I attached it to the frame the next lesson.
Images

Testing
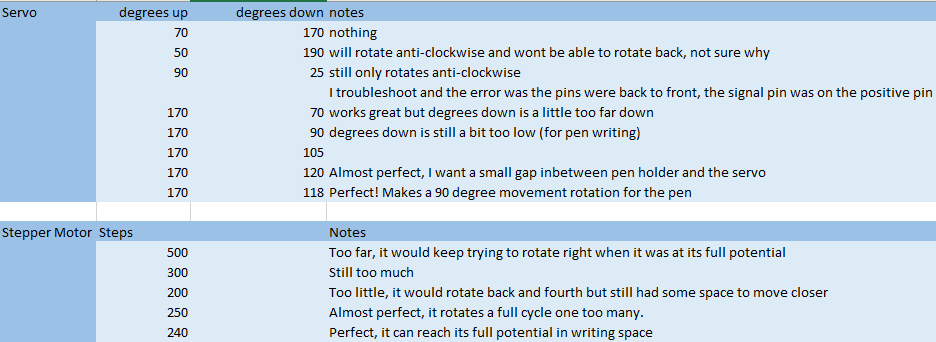
There was no information on the internet for the best values to use for my specific hardware, so I had to go through trial-and-error to find the best variable values for the hardware.
I would log in Excel, for every change in variable and write its result, here is that spreadsheet.
The printer can draw some wobbly lines, this is because of the pen holder is not fully stuck to the stepper motor.
Pen consistency is good, it will slide along the paper and won’t have big ink blots
Problems
- Weak solders (wire would rip off with a gentle push)
- Pen holder frame keeps falling off (attached using duct tape)
- Grbl software cannot be ran at school as it requires administrator privileges, this was a large obstacle and it consumed a lot of time trying to find a work-around
Evaluation
My original goal was to have it play mobile games and click buttons and/or objects using a stylus pen. As I worked on the project it drifted to drawing images. I plan to expand on my original idea if I get more time on it.
I eventually found that the project was quite ambitious and it required two extensions. The entire projects hardware was a challenge to me as I have only ever programmed software. The framework took more time than I expected.
Learning to code in another language was fun. Using an Arduino for the first time was challenging but it has always been something I have wanted to toy with.
During this project, I learnt how to program an Arduino and use various programs, Arduino IDE, Inkscape and Grbl controller. I’m proud of taking the challenge on and I am happy with the result.
Acknowledgements and references
Inkscape, for converting Images to Gcode
Grbl, for controlling the stepper motors and drawing
Makerblog.at, for the pen holder 3d files
artelnjeru01, I., Munggaran, F., bajinra, D., & Grochoła, S. (2019). Draw Freely | Inkscape. Inkscape.org. Retrieved 25 September 2019, from https://inkscape.org/
grbl/grbl. (2019). GitHub. Retrieved 25 September 2019, from https://github.com/grbl/grbl
Projekt: Mini CNC Plotter aus alten CD/DVD-Laufwerken. (2015). Makerblog.at. Retrieved 25 September 2019, from https://www.makerblog.at/2015/02/projekt-mini-cnc-plotter-aus-alten-cddvd-laufwerken/
Project files
The arduino code to draw some simple lines can be downloaded here